Odoo rich-text editor
The Odoo rich-text editor allows creating and editing rich-text content in HTML fields, such as the Internal Notes and Description fields, as well as in Knowledge articles and the Studio report editor, among others. Start typing or use the toolbar or powerbox for formatting and structuring text.
Truco
Hover over any element in the text (header, table, clipboard, etc.) to reveal the (drag) icon. Click and hold the icon to drag and drop the element elsewhere in the text.
Barra de herramientas del editor de texto
Para editar una palabra, oración o párrafo, selecciónela o haga doble clic en ella para abrir la barra de herramientas del editor de texto y aplique cualquiera de las siguientes opciones de formato:
Font style: Change the style using various options, such as Header 1 to 6, Normal, Paragraph, Code, and Quote.
B: Para colocar el texto en negritas.
I: Para colocar el texto en itálicas.
U: Para subrayar el texto.
S: Para tachar el texto.
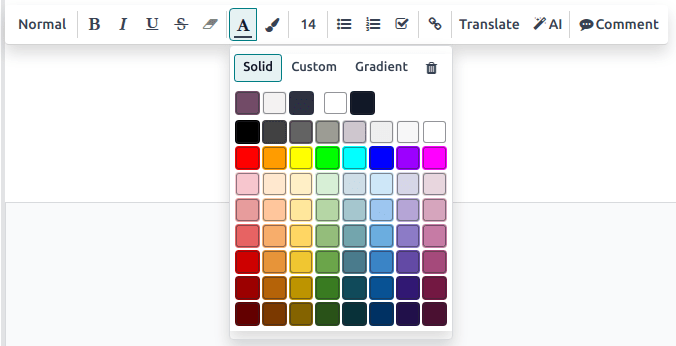
A and (paintbrush) to customize the font and background colors, respectively:
Solid: Select the preferred color from the predefined palette.
Custom: Customize the color palette using the wheel or by configuring the hex code and RGBA values.
Gradient: Select a predefined gradient or customize it by choosing between Linear or Radial and adjusting the wheel.
Font size: Adjust the size of the text.
(bulleted list): Turn the text into a bulleted list.
(numbered list): Turn the text into a numbered list.
(checklist): Turn the text into a checklist.
(link): Insert or edit a URL link to a selected text, and optionally upload an image using its file URL.
Translate: Translate the content in the installed languages.
AI (ChatGPT): Get AI-generated suggestions and adjust the tone by clicking buttons such as Correct, Shorten, Lengthen, Friendly, Professional, and Persuasive.
Truco
- Use the following keyboard shortcuts to apply formatting:
Emphasis: Press
CTRL/CMD+B,CTRL/CMD+I, orCTRL/CMD+Uto apply the bold, italics, or underlined effect.Numbered list: Type
1.,1),A., orA)to start a numbered list.Bulleted list: Type
*or-to start a bulleted list.
Powerbox commands
To use a command, type / to open the powerbox, then enter the command’s name or select from
multiple features to insert tables, images, banners, etc.
Truco
Starting a new paragraph displays a tooltip with command shortcut icons. Click an icon to add the command, or click the (ellipsis) icon to open the powerbox for all commands.
Nota
Commands specific to particular apps are excluded from this description.
Comando |
Uso |
|---|---|
Separador |
Insert a horizontal rule separator. |
2 columnas |
Convertir en 2 columnas. |
3 columnas |
Convertir en 3 columnas. |
4 columnas |
Convertir en 4 columnas. |
Tabla |
Insertar una tabla. |
Lista con viñetas |
Crear una lista con viñetas. |
Lista numerada |
Create a numbered list. |
Lista de verificación |
Create a checklist. |
Cita textual |
Añadir una sección de bloque de cita. |
Código |
Agregar una sección de código. |
Nota
To organize a table, hover over a column or row to reveal the table menu. Click the (ellipsis) icon to move, insert, or delete a column or row.
Comando |
Uso |
|---|---|
Banner Info |
Insert an info banner. |
Banner Success |
Insert a success banner. |
Banner Warning |
Insert a warning banner. |
Banner Danger |
Insert a danger banner. |
Comando |
Uso |
|---|---|
Encabezado 1 |
Encabezado grande |
Encabezado 2 |
Encabezado mediano. |
Encabezado 3 |
Encabezado pequeño. |
Texto |
Paragraph block: Insert a paragraph. |
Cambiar dirección |
Cambiar la dirección del texto. |
Comando |
Uso |
|---|---|
Multimedia |
Insert an image or icon: Search the Unsplash database or upload images, documents, or icons. |
Clipboard |
Add a clipboard section to store content and reuse it in other apps. |
Upload a file |
Add a download box: share images, recordings, or documents that internal users can download. |
Comando |
Uso |
|---|---|
Enlace |
Add a link: Type the label and enter a URL or upload a file, then click Apply. |
Botón |
Add a button: Type the label, enter a URL or upload a file, select the button style, type, and size, then click Apply. |
Artículo |
Insert a shortcut to a Knowledge article. |
Cita |
Add a specific appointment: Select one or several appointment type(s) to assign to relevant users, then click Insert a link. |
Table Of Content |
Highlight the structure (headings): Create a table of content based on the headings. |
Video Link |
Insert a video: Copy-paste the video URL (Youtube, Vimeo, Dailymotion, and Youku only). |
Comando |
Uso |
|---|---|
Emoji |
Add an emoji: search for the desired emoji. |
3 estrellas |
Insert a rating of up to 3 stars. |
5 estrellas |
Insert a rating of up to 5 stars. |
Comando |
Uso |
|---|---|
ChatGPT |
Generate content with AI. |
Comando |
Uso |
|---|---|
Firma |
Insertar su firma. |
Insertar archivo multimedia
To insert media, type /Media or click the (image) icon in the
tooltip, then choose from the following tabs:
Images
Search the Unsplash database to find a suitable image.
Add URL: Copy-paste the image address.
Upload an image: Upload an image into the library.
Documents
Search for a document in the database.
Add URL: Copy-paste a valid URL.
Upload a document: Upload a document from a local drive.
Icons: Search an icon from the selection in the database.
Media editor toolbar
After inserting an image, click it to display the media editor toolbar, and apply any of the following formatting options:
(preview): Preview the image, zoom in or out, print it or download it. Exit the preview by clicking the (close) icon in the top right corner.
Description: Edit the image description and tooltip, then click Save.
(rounded): Apply a rounded shape to the corners of the image.
(circle): Apply a circular shape to the image.
(shadow): Apply a shadow effect to the image.
(image): Apply a border to the image.
(padding): Add an image padding and choose from small, medium, large, or extra large sizes.
Default: Restore the image to its default size.
100%: Set the image to full size.
50%: Set the image to half its size.
25%: Set the image to a quarter of its size.
(object): Resize and rotate the image. Click the (object) icon a second time to reset the transformation.
(crop): Crop the image manually or apply the following options:
Choose from the
Flexible,16:9,4:3,1:1, or2:3aspect ratios.Zoom in or out.
Rotate left or right.
Flip horizontally or vertically.
Reset the image.
Replace: Replace the image by searching in the Unsplash database, adding a URL, or uploading a different one.
(link): Insert a link to the image, type the URL, then click Apply. To remove the link, click the (unlink) icon.
(trash): Remove the image.