Uruguay
Introducción
La localización para Uruguay le permite generar documentos electrónicos con su XML, folio fiscal y firma electrónica, así como conectarse a la autoridad fiscal correspondiente, la Dirección General Impositiva (DGI), a través de Uruware.
Los documentos compatibles son los siguientes:
e-Factura, nota de crédito de e-Factura y nota de débito de e-Factura
e-Ticket, nota de crédito de e-Ticket y nota de débito de e-Ticket
e-Factura de exportación, nota de crédito de e-Factura de exportación y nota de débito de e-Factura de exportación
Es necesario que configure una cuenta de Uruware en la localización para que los usuarios puedan generar documentos electrónicos dentro de Odoo.
Glosario
Los siguientes términos se utilizan en la localización para Uruguay:
DGI: La Dirección General Impositiva es el organismo gubernamental responsable de hacer cumplir el pago de los impuestos en Uruguay.
EDI: Intercambio electrónico de datos y se refiere al envío de documentos electrónicos.
Uruware: Es la organización externa que facilita el intercambio de documentos electrónicos entre empresas y el gobierno uruguayo.
CAE: La Constancia de Autorización de Emisión es un documento solicitado en el sitio web de la autoridad fiscal para habilitar la emisión de facturas electrónicas.
Configuración
Instalación de módulos
Instale los siguientes módulos para obtener todas las funciones de la localización de Uruguay:
Nombre |
Nombre técnico |
Descripción |
|---|---|---|
Uruguay - Contabilidad |
|
Es el paquete de localización fiscal predeterminado. Agrega características contables para la localización de Ecuador, que representan la configuración mínima necesaria para que una empresa opere en Uruguay de acuerdo a los lineamientos establecidos por la DGI. La instalación del módulo carga de forma automática el plan de cuentas, impuestos, tipos de documentos y tipos de soporte tributario. |
Uruguay Accounting EDI |
|
Incluye todos los requisitos técnicos y funcionales para generar y validar documentos electrónicos según la documentación técnica publicada por la DGI. Los documentos autorizados aparecen arriba. |
Nota
Odoo instala automáticamente el módulo base Uruguay - Contabilidad cuando se instala una base de datos con Uruguay seleccionado como país. Sin embargo, para habilitar la facturación electrónica, debe instalar manualmente el módulo Uruguay - Contabilidad EDI (l10n_uy_edi).
Empresa
Abra la aplicación Ajustes para configurar la información de su empresa. Vaya a la sección Empresas, haga clic en Actualizar Información y configure lo siguiente:
Nombre de la empresa
Dirección, incluyendo calle, ciudad, estado, código postal y país.
Tax ID: enter the identification number for the selected taxpayer type.
DGI Main Branch Code: this is part of the XML when creating an electronic document. If this field is not set, all electronic documents will be rejected.
To find the DGI Main Branch Code, follow these steps:
Desde su cuenta de DGI, vaya a .
Seleccione .
Open the generated PDF to get the DGI Main Branch Code from the Domicilio Fiscal Número de Local section.
Vaya a luego de configurar la empresa en los ajustes de la base de datos y busque su empresa para verificar lo siguiente:
El tipo de empresa es Empresa.
El tipo del número de identificación es RUT / RUC.
Configurar una cuenta de Uruware
To set up a Uruware account, follow these steps:
Verify that you have a valid Odoo subscription.
Locate the Uruware credentials settings by navigating to the .
Scroll down to the Uruguayan Localization section and select the environment (Production or Testing).
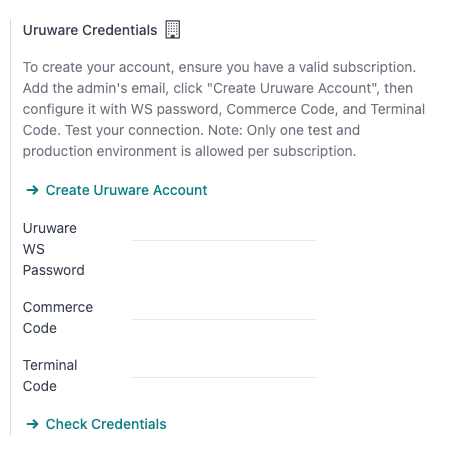
Click on Create Uruware Account.
Upon doing so, an email is sent to the address associated with your Odoo subscription with the password to enter Uruware’s portal and set up your account.
Truco
The email with the credentials is not immediate; it might take up to 48 hours for the account to be created.
The company’s Tax ID needs to be set up to be able to create an Uruware account.
The password sent expires after 24 hours. In this case, reset it by using the Forgot Password link in Uruware’s portal.
Nota
This action will create an account with Uruware with the following information:
Razón social
RUT from the company
Username (the Odoo subscription email or
RUT.odoo. For example:213344556677.odoo)Odoo database link
To ensure your account is created correctly, please add any missing information from above.
Once the account is created and you have received the email containing the credentials, configure your accounts directly in the Uruware testing portal or production portal:
Use the account credentials in the email to log in to the to the corresponding (test or production) portal.
In Uruware’s portal, the following steps are needed to be able to issue invoices from Odoo:
Complete and correct the company’s information.
Add your digital certificate.
Add your CAEs for each document-type you plan to issue.
Configure the format of the PDF to be printed and sent to your customers.
Importante
Be sure to configure two accounts, one for testing and one for production. The certificate is needed in both environments, but CAEs are only needed in production.
Datos de facturación electrónica
To configure the electronic invoice data, an environment and credentials need to be configured. To do so, navigate to and scroll down to the Uruguayan Localization section.
First, select the UCFE Web Services environment:
Production: for production databases. In this mode, electronic documents are sent to DGI through Uruware for their validation.
Testing: for test databases. In this mode, the direct connection flows can be tested, with the files sent to the DGI testing environment through Uruware.
Demo: files are created and accepted automatically in demo mode but are not sent to the DGI. For this reason, rejection errors will not appear in this mode. Every internal validation can be tested in demo mode. Avoid selecting this option in a production database.
Nota
Using Demo mode does not require a Uruware account.
Then, enter the Uruware Data:
Uruware WS Password
Commerce Code
Terminal Code
Nota
This data can be obtained from the Uruware portal after configuring the Uruware account.
To get the Uruware WS Password, go to and look for the Validators and Additional Information tab to find WS Password.
To get the Commerce Code, go to .
To get the Terminal Code, go to .
Master data
Plan contable
The chart of accounts is installed by default as part of the set of data included in the localization module, the accounts are mapped automatically in taxes, default accounts payable, and default accounts receivable.
Accounts can be added or deleted according to the company’s needs.
Ver también
Contactos
To create a contact, navigate to and select New. Then enter the following information:
Nombre de la empresa
Dirección:
Street: required to confirm an electronic invoice.
Ciudad
Estado
Código postal
Country: required to confirm an electronic invoice.
Identification Number:
Type: select a identification type.
Number: required to confirm an electronic invoice.
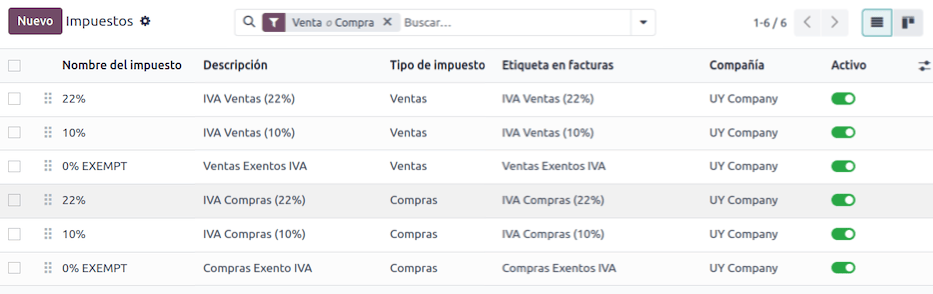
Impuestos
As part of the Uruguay localization module, taxes are automatically created with its configuration and related financial accounts.
Tipos de documentos
Some accounting transactions, like customer invoices and vendor bills are classified by document types. These are defined by the government fiscal authorities, in this case by the DGI.
Each document type can have a unique sequence per journal where it is assigned. The data is created automatically when the localization module is installed, and the information required for the document types is included by default.
To review the document types included in the localization, navigate to .
Nota
In Uruguay, CAEs must be uploaded in Uruware. Sequences (and PDFs) are received in Odoo from Uruware, based on their CAEs. CAEs are only used in production. When testing, only a range of sequences used in Uruware need to be set.

Diarios de ventas
To generate and confirm an electronic document that will be validated by DGI, the sales journal needs to be configured with the following:
Invoicing Type: by default Electronic option is set. This is necessary to send electronic documents via web service to the Uruguayan government through Uruware. The other option, Manual, is for open invoices previously stamped in another system, for example, in the DGI.
Use Documents?: Activate this option if this journal will use documents from the list of document types in Odoo.
Flujos de trabajo
Once you have configured your database, you can create your documents.
Documentos de ventas
Facturas de cliente
Customer invoices are electronic documents that, when validated, are sent to DGI via Uruware. These documents can be created from your sales order or manually. They must contain the following data:
Cliente: escriba la información del cliente.
Due date: to compute if the invoice is due now or later (contado or crédito, respectively).
Journal: select the electronic sales journal.
Document Type: document type in this format, for example,
(111) e-Invoice.Products: specify the product(s) with the correct taxes.
Nota
Every document type has a specific credit note and debit note (e.g., the document type (111) e-Invoice has an (112) e-Invoice Credit Note).
Nota de crédito del cliente
La nota de crédito del cliente es un documento electrónico que se envía a la DGI mediante Uruware luego de ser validado. Es necesario tener una factura validada (es decir, registrada) para poder registrar una nota de crédito. Una vez en la factura haga clic en el botón Nota de crédito para abrir el formulario Crear nota de crédito y complete la siguiente información:
Motivo: escriba el motivo de la nota de crédito.
Journal: select the journal that has to be electronic and has the Use Documents? option active.
Document Type: select the credit note document type.
Fecha de reversión: agregue la fecha.
Notas de débito del cliente
La nota de débito del cliente es un documento electrónico que se envía a la DGI mediante Uruware luego de ser validado. Es necesario tener una factura validada (es decir, registrada) para poder registrar una nota de débito. Una vez en la factura haga clic en el icono (menú Acción), seleccione la opción Nota de débito para abrir el formulario Crear nota de crédito y complete la siguiente información:
Motivo: escriba el motivo de la nota de débito.
Journal: Select the journal that has to be electronic and has the Use Documents? option active.
Copy lines: Tick the checkbox to copy the invoice lines to the debit note.
Debit note date: Type the date.
Nota
Confirm the invoice to create it with an internal reference. To send the document to DGI via Uruware, click on Send and Print and select the checkbox Create CFE. The legal document sequence (number) is brought from Uruware once the document has been processed. Make sure you have CAEs available in Uruware.
Nota
The PDF of the validated document is pulled from Uruware following the specification by the Uruguayan government (DGI).
Addendas and disclosures
Addendas and disclosures are additional notes and comments added to an electronic document that can be mandatory or optional. To create a new addenda, go to and click New.
Complete la siguiente información:
Name: name of the addenda or mandatory disclosure.
Type: Select the type of remark, this will add it to the specific section in the XML.
Is legend: Select this box if the text is a mandatory disclosure, leave it blank if it is additional information.
Content: Add the complete text of the addenda or disclosure.
Leyenda and additional information in product
To add a leyenda or additional information to the product and XML, it is necessary to add the preconfigured addenda and disclosure to the product in the invoice line. Add the leyenda in the Disclosure field of the product specified in the line.
Leyenda e información adicional
To add a leyenda or additional information to the electronic invoice and XML, access the invoice, go to the Other Info tab, and select the desired addenda in the Addenda and Disclosure field. The addenda and disclosures added here will appear in the XML and visibly in the PDF document.
This applies to the following types of addendas:
Documento
Emisor
Receiver
Addendas
Nota
To add a temporary note to the electronic document, use the Terms and Conditions field. This information will be sent in the addenda of the invoice, but it won’t be saved for future documents.